Python Debugging/ja: Difference between revisions
No edit summary |
No edit summary |
||
| Line 51: | Line 51: | ||
== リモートデバッガを有効にする == | == リモートデバッガを有効にする == | ||
Aptana | Aptana Studioでリモートデバッガを有効にして (手順はこちら: http://pydev.org/manual_adv_remote_debugger.html) Vectorworksでスクリプトを実行します。 You may need to enable the Debug perspective in Aptana before being able to enable the debug server, or the mentioned "green button" of the instructions will not be available: | ||
# Enable the Debug Perspective view: | # Enable the Debug Perspective view: | ||
#* '''Window > Open Perspective > Other > Debug''': a new icon with a green bug will appear on the rightmost corner of the window (see screenshot below), this toggles the debug perspective | #* '''Window > Open Perspective > Other > Debug''': a new icon with a green bug will appear on the rightmost corner of the window (see screenshot below), this toggles the debug perspective | ||
Revision as of 01:52, 15 December 2017
Pythonはオープンソースのスクリプティングエンジンです。このエンジンに接続してデバッグ可能な、多くの無料および有料のIDEが存在します。インターネットでそれらを検索して試してみることができます。さらに簡単なデバッグの方法が見つかるかもしれません。
.Python|Python ..VS:Function Reference|Function Reference ..VS:Function_Reference_Appendix|Appendix ..Python Debugging|Debugging with Python
Aptana Studioでのデバッグ
ここでは、EclipseのバージョンであるAptana Studioを使用します。
ApatanaはPythonプロジェクトの管理が行えるIDEです。また、Vectorworksのようなリモートのpythonエンジンをデバッグできます。これには、Eclipseでpythonを実行するプラグインPyDevが含まれています。
リモートデバッグの方法についてはこちら: http://pydev.org/manual_adv_remote_debugger.html
Aptanaを設定する
- Python 3.3 runtime (download)をインストールします。 I’ll hook Aptana to this version later. 技術的には必要ありませんが、こうすることで編集中にApatanaがシンタックスエラーをレポートすることができるようになります。
- Aptana Studio 3 (download)をインストールします。
- Aptanaは多くの言語をサポートしています。初回だけ、Pythonインタプリタ(上で述べたpydevプラグイン)を設定する必要があります:
- Preferences > PyDev > Interpreters > Python Interpreter
- click on Advanced Auto-Config
- select the Python 3.3 you just installed in step 1. We wont actually use it, but will let Aptana use it to syntax check.
- See Configure Interpreter in the pdev documentation for more infos.
- Specify a Workspace: the directory where you store your Projects, in our case the plug-in folders with the code. Depending on Aptana's defaults, the application will prompt you with a workspace choice at every launch:
- When prompted at start: choose a directory outside any Vectorworks path.
- When you need to manually change the path: File > Switch Workspace > Other...: choose a directory outside any Vectorworks path.
- Mac Example: <User>/Documents/Python_VW
- This is VERY important for the reason that a workspace directory will contain a ton of files that start with ‘.’. If this path is visible by Vectorworks, it will make it launch very slowly (from traversing all these files and sub-folders). Also take care to select a directory with proper read/write user rights, for example within the folder "Documents".
- Note: you can have multiple workspaces. The list will be visible here: Preferences > General > Startup and Shutdown > Workspaces
- Now, you can create or import a Project: a directory containing all files needed for a plug-in, for example the folder Python Sample Menu Command.
- Import an existing Project (for example the Python Sample Menu Command): File -> New -> Project... > General
- Create a new python Project: file > new > project > PyDev > PyDev project
- See Creating a Project in the pdev documentation for more infos.
VWを設定する
デバッグの方法として、Apatanaのリモートデバッガを使用します: http://pydev.org/manual_adv_remote_debugger.html. VectorworksでPythonの正しい環境パスを設定してください:
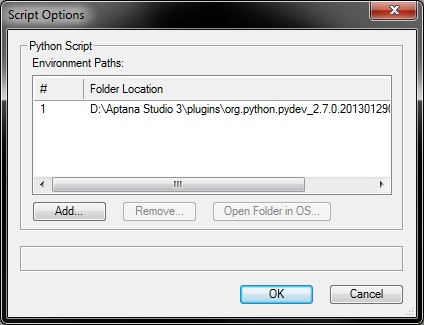
- Vectorworksメニュー ツール -> プラグイン -> スクリプトオプション : 必要なフォルダへの環境パスを追加します:
- Windowsの例: D:\Aptana Studio 3\plugins\org.python.pydev_2.7.0.2013012902\pysrc
- Macの例: /Applications/Aptana Studio 3/plugins/org.python.pydev_3.0.0.1388187472/pysrc
- 注意
- Apatana Studioをインストールした場所に適宜変更する必要があります。
- Vectorworksメニュー ツール -> プラグイン -> スクリプトオプション : 必要なフォルダへの環境パスを追加します:
- スクリプトにPyDevリモートデバッガのimportを記述します。Python Sample Menu Command には、PyDevデバッガを有効にするコメント付きのコードが含まれています:

import pydevd
pydevd.settrace(suspend=False)
- 注意
- スクリプトが失敗した場合は「pydevd」モジュールが見つからないのが原因です。環境パスでVectorworksのPythonを指定して、モジュールが見つかるようにしてください。
リモートデバッガを有効にする
Aptana Studioでリモートデバッガを有効にして (手順はこちら: http://pydev.org/manual_adv_remote_debugger.html) Vectorworksでスクリプトを実行します。 You may need to enable the Debug perspective in Aptana before being able to enable the debug server, or the mentioned "green button" of the instructions will not be available:
- Enable the Debug Perspective view:
- Window > Open Perspective > Other > Debug: a new icon with a green bug will appear on the rightmost corner of the window (see screenshot below), this toggles the debug perspective
- Start the remote pydev debugger server: click on the green button with the bug and a P, which you'll find about the middle of the window (again screenshot below)
関連項目
Python basic information: Python